
PyTorch 实现一个 CNN 实例
以下示例展示如何用 PyTorch 构建一个简单的 CNN 模型,用于 MNIST 数据集的数字分类。
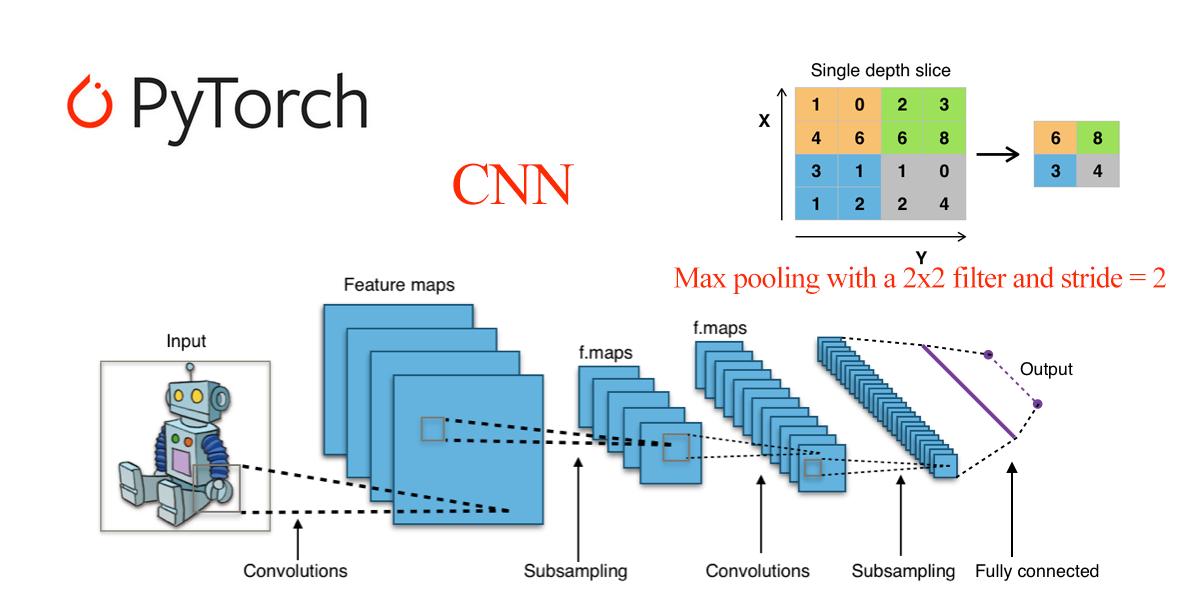
主要步骤:
- 数据加载与预处理:使用 torchvision 加载和预处理 MNIST 数据。
- 模型构建:定义卷积层、池化层和全连接层。
- 训练:通过损失函数和优化器进行模型训练。
- 评估:测试集上计算模型的准确率。
- 可视化:展示部分测试样本及其预测结果。
import torch
import torch.nn as nn
import torch.nn.functional as F
import torch.optim as optim
from torchvision import datasets, transforms
# 1. 数据加载与预处理
transform = transforms.Compose([
transforms.ToTensor(), # 转为张量
transforms.Normalize((0.5,), (0.5,)) # 归一化到 [-1, 1]
])
# 加载 MNIST 数据集
train_dataset = datasets.MNIST(root='./data', train=True, transform=transform, download=True)
test_dataset = datasets.MNIST(root='./data', train=False, transform=transform, download=True)
train_loader = torch.utils.data.DataLoader(dataset=train_dataset, batch_size=64, shuffle=True)
test_loader = torch.utils.data.DataLoader(dataset=test_dataset, batch_size=64, shuffle=False)
# 2. 定义 CNN 模型
class SimpleCNN(nn.Module):
def __init__(self):
super(SimpleCNN, self).__init__()
# 定义卷积层
self.conv1 = nn.Conv2d(1, 32, kernel_size=3, stride=1, padding=1)
self.conv2 = nn.Conv2d(32, 64, kernel_size=3, stride=1, padding=1)
# 定义全连接层
self.fc1 = nn.Linear(64 * 7 * 7, 128) # 展平后输入到全连接层
self.fc2 = nn.Linear(128, 10) # 10 个类别
def forward(self, x):
x = F.relu(self.conv1(x)) # 第一层卷积 + ReLU
x = F.max_pool2d(x, 2) # 最大池化
x = F.relu(self.conv2(x)) # 第二层卷积 + ReLU
x = F.max_pool2d(x, 2) # 最大池化
x = x.view(-1, 64 * 7 * 7) # 展平
x = F.relu(self.fc1(x)) # 全连接层 + ReLU
x = self.fc2(x) # 最后一层输出
return x
# 创建模型实例
model = SimpleCNN()
# 3. 定义损失函数与优化器
criterion = nn.CrossEntropyLoss() # 多分类交叉熵损失
optimizer = optim.SGD(model.parameters(), lr=0.01, momentum=0.9)
# 4. 模型训练
num_epochs = 5
model.train() # 设置模型为训练模式
for epoch in range(num_epochs):
total_loss = 0
for images, labels in train_loader:
outputs = model(images) # 前向传播
loss = criterion(outputs, labels) # 计算损失
optimizer.zero_grad() # 清空梯度
loss.backward() # 反向传播
optimizer.step() # 更新参数
total_loss += loss.item()
print(f"Epoch [{epoch+1}/{num_epochs}], Loss: {total_loss / len(train_loader):.4f}")
# 5. 模型测试
model.eval() # 设置模型为评估模式
correct = 0
total = 0
with torch.no_grad(): # 关闭梯度计算
for images, labels in test_loader:
outputs = model(images)
_, predicted = torch.max(outputs, 1)
total += labels.size(0)
correct += (predicted == labels).sum().item()
accuracy = 100 * correct / total
print(f"Test Accuracy: {accuracy:.2f}%")