本文手把手教你搭建专业的深度学习开发环境,涵盖Anaconda配置、虚拟环境管理、Jupyter Lab使用和GPU加速设置,附详细代码和排错指南。
核心对比:
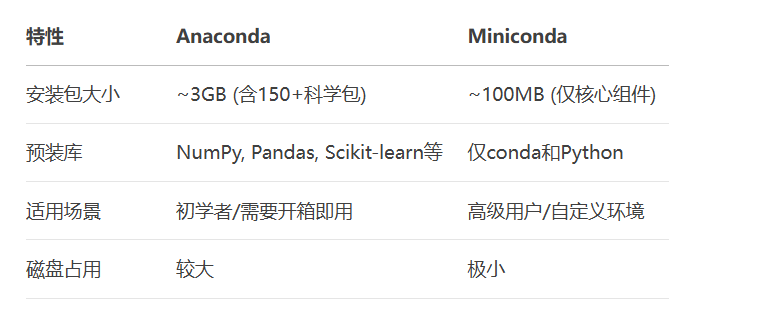
推荐选择:
# Miniconda下载(Linux/macOS示例)
wget https://repo.anaconda.com/miniconda/Miniconda3-latest-Linux-x86_64.sh
# 安装命令
bash Miniconda3-latest-Linux-x86_64.sh
# 创建Python3.10环境
conda create --name dl_env python=3.10
# 激活环境
conda activate dl_env
# 安装核心包
conda install numpy pandas matplotlib jupyter
# 查看所有环境
conda env list
# 复制环境
conda create --name dl_env_copy --clone dl_env
# 删除环境
conda remove --name dl_env_copy --all
# 导出环境配置
conda env export > environment.yml
# 根据YAML文件创建环境
conda env create -f environment.yml
# 导出pip安装包列表
pip freeze > requirements.txt
# 根据requirements安装
pip install -r requirements.txt
# 安装Jupyter Lab
conda install -c conda-forge jupyterlab
# 启动服务(自动打开浏览器)
jupyter lab
# 指定端口启动
jupyter lab --port 8889
# 设置访问密码
jupyter lab password
# 安装常用扩展
pip install jupyterlab_widgets   # 交互控件
pip install jupyterlab_templates # 模板功能
pip install jupyterlab_code_formatter # 代码格式化
# 启用扩展
jupyter labextension install @jupyter-widgets/jupyterlab-manager
jupyter labextension install jupyterlab_templates
# 生成配置文件
jupyter lab --generate-config
# 编辑配置文件
vim ~/.jupyter/jupyter_lab_config.py
# 添加以下配置:
c.ServerApp.ip = '0.0.0.0'        # 允许所有IP访问
c.ServerApp.open_browser = False  # 不自动打开浏览器
c.ServerApp.port = 8888           # 指定端口
c.ServerApp.password = 'sha1:...' # 配置密码hash

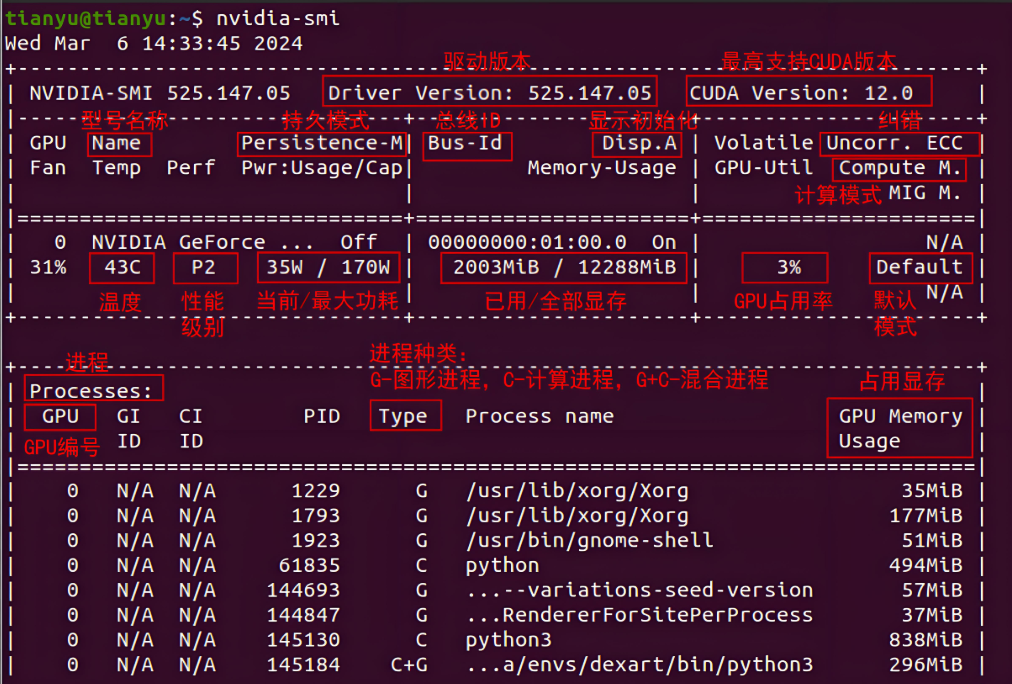
# 查看NVIDIA显卡信息
nvidia-smi
# 检查CUDA兼容性(输出CUDA版本)
nvidia-smi | grep "CUDA Version"
# 查看Linux内核版本
uname -r
# 示例:CUDA 12.1安装
wget https://developer.download.nvidia.com/compute/cuda/12.1.0/local_installers/cuda_12.1.0_530.30.02_linux.run
sudo sh cuda_12.1.0_530.30.02_linux.run
配置环境变量
# 添加到~/.bashrc
echo 'export PATH=/usr/local/cuda-12.1/bin:$PATH' >> ~/.bashrc
echo 'export LD_LIBRARY_PATH=/usr/local/cuda-12.1/lib64:$LD_LIBRARY_PATH' >> ~/.bashrc
source ~/.bashrc
# 验证安装
nvcc --version
tar -xzvf cudnn-linux-x86_64-8.x.x.x_cudaX.Y-archive.tar.xz
sudo cp cuda/include/cudnn*.h /usr/local/cuda/include
sudo cp cuda/lib64/libcudnn* /usr/local/cuda/lib64
sudo chmod a+r /usr/local/cuda/include/cudnn*.h /usr/local/cuda/lib64/libcudnn*
import torch
print(f"PyTorch版本: {torch.__version__}")
print(f"CUDA可用: {torch.cuda.is_available()}")
print(f"CUDA版本: {torch.version.cuda}")
print(f"GPU数量: {torch.cuda.device_count()}")
print(f"当前GPU: {torch.cuda.current_device()}")
print(f"设备名称: {torch.cuda.get_device_name(0)}")
# 张量计算测试
x = torch.randn(10000, 10000).cuda()
y = torch.randn(10000, 10000).cuda()
z = x @ y  # GPU矩阵乘法
print(f"计算完成! 结果形状: {z.shape}")import tensorflow as tf
print(f"TensorFlow版本: {tf.__version__}")
print(f"GPU列表: {tf.config.list_physical_devices('GPU')}")
# 创建GPU计算任务
with tf.device('/GPU:0'):
a = tf.constant([1.0, 2.0, 3.0], shape=[3], name='a')
b = tf.constant([4.0, 5.0, 6.0], shape=[3], name='b')
c = tf.add(a, b, name='c')
print("计算结果:", c.numpy())✅ 成功标志:
torch.cuda.is_available()返回True
TensorFlow显示检测到GPU设备
❌ 常见问题:
CUDA版本与框架不匹配
显卡驱动过旧
cuDNN未正确安装
# 添加清华源
conda config --add channels https://mirrors.tuna.tsinghua.edu.cn/anaconda/pkgs/main
conda config --add channels https://mirrors.tuna.tsinghua.edu.cn/anaconda/pkgs/r
conda config --add channels https://mirrors.tuna.tsinghua.edu.cn/anaconda/pkgs/msys2
# 显示源地址
conda config --set show_channel_urls yes
# 清除索引缓存
conda clean -i
# 查看可用内核
jupyter kernelspec list
# 添加虚拟环境到Jupyter
conda activate dl_env
python -m ipykernel install --user --name dl_env --display-name "Python (DL)"
# 删除内核
jupyter kernelspec uninstall dl_env
# Dockerfile示例
FROM nvidia/cuda:12.1.0-base
# 安装Miniconda
RUN apt-get update && apt-get install -y wget
RUN wget https://repo.anaconda.com/miniconda/Miniconda3-latest-Linux-x86_64.sh
RUN bash Miniconda3-latest-Linux-x86_64.sh -b -p /opt/conda
ENV PATH /opt/conda/bin:$PATH
# 创建环境
RUN conda create -n dl_env python=3.10
# 安装框架
RUN conda install -n dl_env pytorch torchvision torchaudio pytorch-cuda=12.1 -c pytorch -c nvidia
# 检查驱动兼容性
nvidia-smi
# 查看CUDA工具包安装
ls /usr/local/cuda
# 验证环境变量
echo $LD_LIBRARY_PATH
Jupyter无法启动:
# 检查端口冲突
netstat -tuln | grep 8888
# 重置配置文件
jupyter lab --generate-config -y
conda安装缓慢:
# 使用Mamba加速器
conda install -c conda-forge mamba
mamba install numpy pandas
GPU内存不足:
# PyTorch内存优化
torch.cuda.empty_cache()
# 设置TensorFlow GPU内存增长
gpus = tf.config.list_physical_devices('GPU')
for gpu in gpus:
tf.config.experimental.set_memory_growth(gpu, True)Miniconda/Anaconda 安装
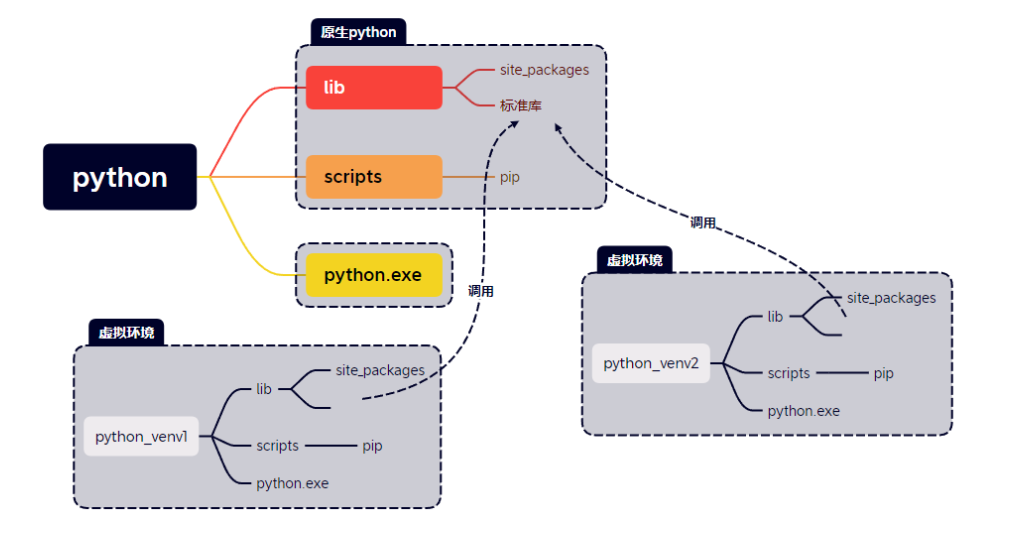
虚拟环境创建
Jupyter Lab 安装
GPU支持:
NVIDIA驱动更新
CUDA工具包安装
cuDNN 配置
框架GPU验证通过
优化配置:
Conda源加速
Jupyter内核配置
环境导出文件更新
按照本指南配置的环境可满足绝大多数深度学习项目需求,建议保存环境快照以便快速恢复。更多AI大模型应用开发学习内容视频及资料,尽在聚客AI学院。